The terminal
The terminal is an app on your computer. It's maybe the most useful one, because you can use it to tell your computer to do pretty much whatever you want. We'll just go over the basics.
Opening the terminal
First, we need to find the terminal app.
- On a Mac: Press Cmd+Space. This will open up the Spotlight Search. Type "terminal", and you should see the app icon pop up. Double click to open it.
- On Windows: This is a bit tricker, since Microsoft is a rebel and doesn't support UNIX. You'll need to install Git Bash. During installation, select the option "Use Windows' default console window".
Now that you're all set up with the terminal, make sure you can readily access it. For Mac users, I recommend you right click the app icon and select "Options: Keep in Dock". You will be using this app a lot in this class, and even more if you are pursuing computer science as a major.
Your home directory
A directory is a folder on your computer, like "Downloads" or "Documents". Your home directory is the main folder, the one that contains everything in your computer profile. Let's go find it.
- On a Mac: You've probably never encountered your home directory in Finder. Since most people never need to access it, Apple sort of hides it from you. The good news is, it's easy to find! Open Finder. On the left, you should see some of the folders you own, like "Downloads". Click on one of those. Then right click the icon that appears at the top of the Finder window. You'll see a little menu appear, as in this screenshot:
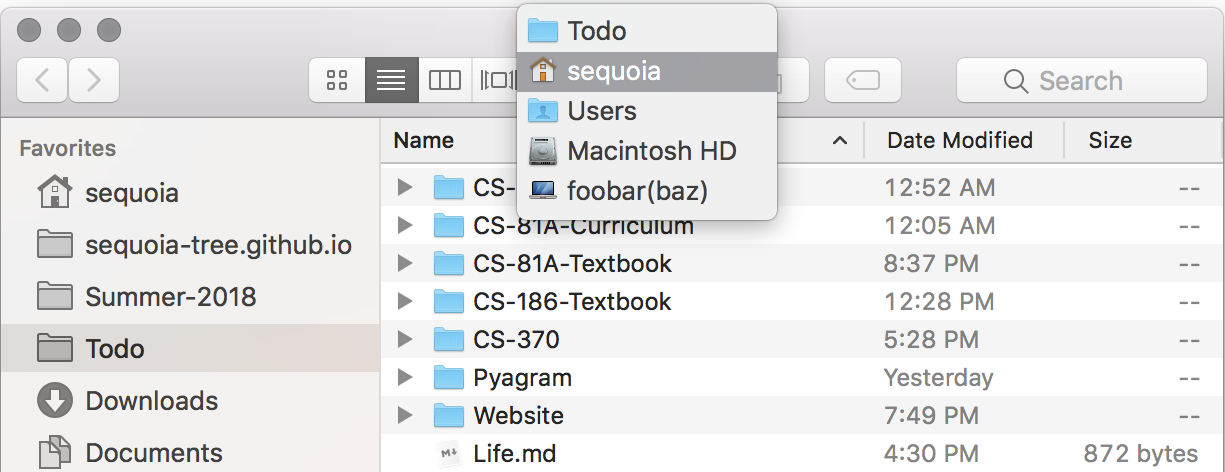 Click the directory with the picture of the house. This takes you to your home directory. After entering your home directory, drag the house from the top of your Finder window to the menu on the left. That way you can always access your home directory in a snap. In the screenshot above, I put my home directory right above the folder called "sequoia-tree.github.io".
 - On Windows: From the Windows start menu, you should see a folder called "My Computer", or in newer versions of Windows, "This PC". That's actually your home directory.
Navigating with the terminal
When you open the terminal, you probably see something like this:
MacBook-Pro:~ sequoia$This is called your bash prompt. It's where you type text into the terminal. The part after the colon tells us what directory we're in now, and the squiggly denotes your home directory. (So in the example above, I'm in my home directory.) This is the same folder you opened in Finder (or the Windows Explorer) just a minute ago. Whenever you open the terminal, you will be in your home directory.
In order to see the contents of your current directory, use the ls command, short for "list". Here's what I see when I type it into my bash prompt:
MacBook-Pro:~ sequoia$ ls
Desktop/                Movies/                 Todo/
Documents/              Music/                  env/
Downloads/              Pictures/               sequoia-tree.github.io/
Library/                Public/
These are all the contents of my home directory. You can see folders for my downloads, documents, todo list, and some other miscellaneous items. ls just shows you the contents of whatever directory you're in.
We're almost ready to navigate through your computer using only the terminal. The last step is learning how to move between directories. How do we go from my home directory to my "Todo" folder, for instance? This is where the cd command comes in. It's short for "change directory". Here's an example:
MacBook-Pro:~ sequoia$ cd Todo
MacBook-Pro:~/Todo sequoia$ ls
CS-186-Textbook/            Life.md
CS-370/                     Pyagram/
CS-61A-Fall-2018/           Website/
CS-81A-Curriculum/          untitled.md
CS-81A-Textbook/
Notice that after the colon, I now see ~/Todo. That's the computer's way of saying I'm in my Todo directory, which is in my home directory. Whatever folder you end up in, your computer will always display the path from home. You can always get back home by running cd ~ or cd ~/. (The slash is used to separate the names of different folders in your path, as you can see in the next example.) Let's try out our cool new skills:
MacBook-Pro:~ sequoia$ cd Documents/UC-Berkeley
MacBook-Pro:~/Documents/UC-Berkeley sequoia$ ls
Year-1/ Year-2/ Year-3/
MacBook-Pro:~/Documents/UC-Berkeley sequoia$ cd Year-2
MacBook-Pro:~/Documents/UC-Berkeley/Year-2 sequoia$
We say the working directory is whatever folder you are currently in. In this example, my working directory was initially my home directory. Next it was my "UC-Berkeley" folder which I keep inside "Documents", and after that it was the folder called "Year-2".
Sometimes you may also want to go "back", for example from your documents folder to your home directory. You can do that like so:
MacBook-Pro:~/Documents sequoia$ cd ..
MacBook-Pro:~ sequoia$
Staying organized
In this class there will be lots of files to keep track of, so it will be wise to make a folder for all your assignments. Since I obsessively nest folders inside other folders, I keep a separate folder for each year, semester, and class. For instance, my CS 61A work is all under ~/Documents/UC-Berkeley/Year-1/Fall-2016/CS-61A. I also have subfolders for homework, lab, and projects, but that's just my preference. Take a moment now to make your own folder for this class, wherever you think it's convenient. (I notice most folks like to keep it on their desktop, so they don't even have to open Finder to access it.)
Over the course of this class, you will download your assignments from the class website. Make sure to keep them all in the folder you just set up, so that you can find all your work in one organized location on your computer. I have worked with a lot of students who did not heed this advice, and they usually end up with multiple copies of a single homework assignment floating around, not knowing wich copy is the one they're editing or the one they submitted. Please keep organized, so you don't make the same mistake.
Shortcuts
After you set up your directory for this class, try navigating to it using the cd command in the terminal. You might realize it's a bit of a hassle, and certainly not something you want to be doing several times a day, let alone several times a week. There are two good solutions.
- Drag and drop: Try opening up a new terminal window. Without pressing Enter, type
cdinto the bash prompt, and then type a single space. Also navigate to your new class folder using Finder. Drag and drop the icon from the top of the Finder window, into your terminal window. You'll notice the file path automatically shows up. Press Enter to run the command. - Aliasing: This method is a bit more technical, but also more convenient. It's totally up to you whether you want to do it or not. Also note I have only tried this on a Mac and I'm sure the process is a bit different for Windows computers. First go to your home directory in the terminal. We're going to access an "invisible" file called
.bash_profile, which gets run every time you open up the terminal. (Invisible files are just files that Apple hid from you because most people don't need to access them.)
This should openMacBook-Pro:~ sequoia$ open .bash_profile.bash_profilein a text editor like TextEdit. Now, on any blank line, go ahead and set up what's called an alias. Here's an example from my.bash_profile:
Notice there are no spaces around the equals sign. Also, the quotes are unformatted single quotes. You can copy and paste them from the snippet of code above. Just replacealias ucb='cd ~/Documents/UC-Berkeley/Year-2/Spring-2018'ucbwith whatever you want your custom command to be, as long as it is only one word, and replace the path with wherever you put your folder for this class. Then save your changes to.bash_profileand restart the terminal app. Just like that, you made your own custom terminal command! Here's an example using the one I defined above:MacBook-Pro:~ sequoia$ ucb MacBook-Pro:~/Documents/UC-Berkeley/Year-2/Spring-2018 sequoia$
Here's another nice shortcut. Often, you'll want to run a command in the terminal that you recently typed before. You can save time by cycling through your previous commands using the up-arrow key.
Python
Okay, so learning about the terminal is pretty dry stuff. Now let's get set up with the much cooler aspect of this class: Python. This is a computer programming language named after the species of tropical snake that invented it.
Installing Python
Python is available for free download online. Here's how to install it:
- On a Mac: Download and run the Python installer for Mac OS.
- On Windows: Download and run the Python installer for Windows. Make sure to check the box labeled "Add Python 3.6 to PATH".
- On Linux: From the terminal, run this command:
sudo apt-get install python3.
After you run the installer, you should be all set up! Let's test it out. In the terminal, run the command python3. (If you're using Windows, the command might simply be python.) You should see a Python interpreter appear, which looks something like this:
Python 3.6.5 (v3.6.5:f59c0932b4, Mar 28 2018, 03:03:55)
[GCC 4.2.1 (Apple Inc. build 5666) (dot 3)] on darwin
Type "help", "copyright", "credits" or "license" for more information.
>>>
Verify that at the beginning of the first line, you see version 3.5.1 or later. If you're on a Mac, running python may open an interpreter for version 2.7.10 so make sure you always use the command python3.
The Python interpreter
When you open the Python interpreter from the terminal, you should see 3 greater-than symbols at the far left. You can type Python code here, and run it. In this chapter we won't talk about all the awesome stuff you can do with Python, so for now just try this to make sure everything is working:
>>> import thisYou should see a little easter-egg put in by the creators of Python. It likely won't make much sense right now, but maybe by the end of the class you'll understand what it's all about.
Whenever you want to test out some code, you should try it in the Python interpreter. It's a very useful tool for experimenting and answering your own questions about how Python works. Don't forget about it. Students often contact me with questions they could've easily answered on their own, just by trying things out in the interpreter. And while I'm perfectly happy to be of service, it's a lot more convenient for you (and helps you develop your debugging skills) if you try to figure things out alone first.
Also, keep in mind that the Python interpreter is not the same as the terminal. When you see your bash prompt with the dollar sign, you're in the terminal. When you see the 3 greater-than symbols, you're in the Python interpreter. To open the Python interpreter from the terminal, run python3 or python as we saw earlier. To exit the Python interpreter and get back to the terminal, run exit() or press Ctrl+D.
Writing code
Code is sort of like an essay, but the kind of essay your computer can understand. Technically you could write all your code in the terminal, but that would be like writing an essay in pen on your first draft: hard to edit, and pretty frustrating. Most of the time you write code in a text document, like you would with an essay. You just can't use the editors you're familiar with (Pages, Microsoft Word, etc.) because they store formatted text instead of unformatted text.
Picking a text editor
It's time to get you set up with a text editor suitable for writing code. There are a few to choose from, and we'll talk more about this later, but for now I recommend Atom or Sublime. They're both great minimal code editors appropriate for getting started. As with the terminal, you'll be using your text editor frequently so make sure you can readily access it.
Conveniently, you can open a folder or text file in either of these editors, simply by dragging and dropping it onto the app icon.
Running code from a file
Using either of these code editors, make a Python file. This will be a document ending with the extension ".py". Save it to a directory that's easy to access, like your documents folder, or else it will be hard to find. You can write Python code in this file, just like you would write an essay in a text file. If you want to try it out now, write print('Yowzah!'). Don't worry about what this does yet, since we still haven't started learning how to write code. When you're done, be sure to save your work. Then you can run your code from the terminal using python3 (or python if you're on Windows), like so:
MacBook-Pro:~/Documents sequoia$ python3 my_file.pyIn order for this to work, you have to be in the same directory as the file you're trying to run. In the example above, my_file.py would have to be in my documents folder.
Please make sure to always save the file you're writing, before you try running it. This is just like how you want to save an essay you're writing, before you try printing it. Far too often, students get really confused because they're running a file but they haven't saved their changes to it yet. Don't make that mistake.
Now you're all set up and ready to get cracking! The awesome computer science starts in the next chapter.